GLC Colorless Deck: Top Deck Simulator

Top Deck Simulator
Hello CardBoard Warriors readers! This is NOLOAF, I’m a YouTube Content Creator who happens to love the Pokémon TCG. I love playing Retro Formats such as 2010 and 2011, and have found myself playing tons of Gym Leader Challenge in the past year. I’ve tinkered with over half the Types and have had tons of fun with them, but time and time again sitting down to actually play, I find myself playing Colorless. It’s the type I have found the most success with, as I’ve been able to win my local multiple times with the deck, and even won CBW GLC Webcam #83 with an older variant. In this article, I want to outline how the list came to be, the advantages of playing Colorless, and knock out a couple of questions people may have about my current list that on the surface may seem questionable.
The main appeal of Colorless, in my opinion, is its excessive amount of Draw Pokémon compared to other Types, and Double Colorless Energy/Twin Energy/Double Turbo Energy. More draw simply means you’re that much less likely to dead draw and that much more likely to be able to “play the game” than your opponent. And to be able to attach two energies in one turn, and have what are essentially multiple copies of Double Colorless Energy, is the equivalent of legal cheating. These are the selling points of Colorless and when I began my deckbuilding, I knew these were the advantages I wanted to play into. I put 60 cards into my deck and I want to see all 60 of those cards every game using a whole host of the Draw Pokémon Colorless has at its disposal. And I want to be able to use Double Colorless Energy/Twin Energy/Double Turbo Energy to be able to swing as soon as possible before my opponent has even had a chance to set up.
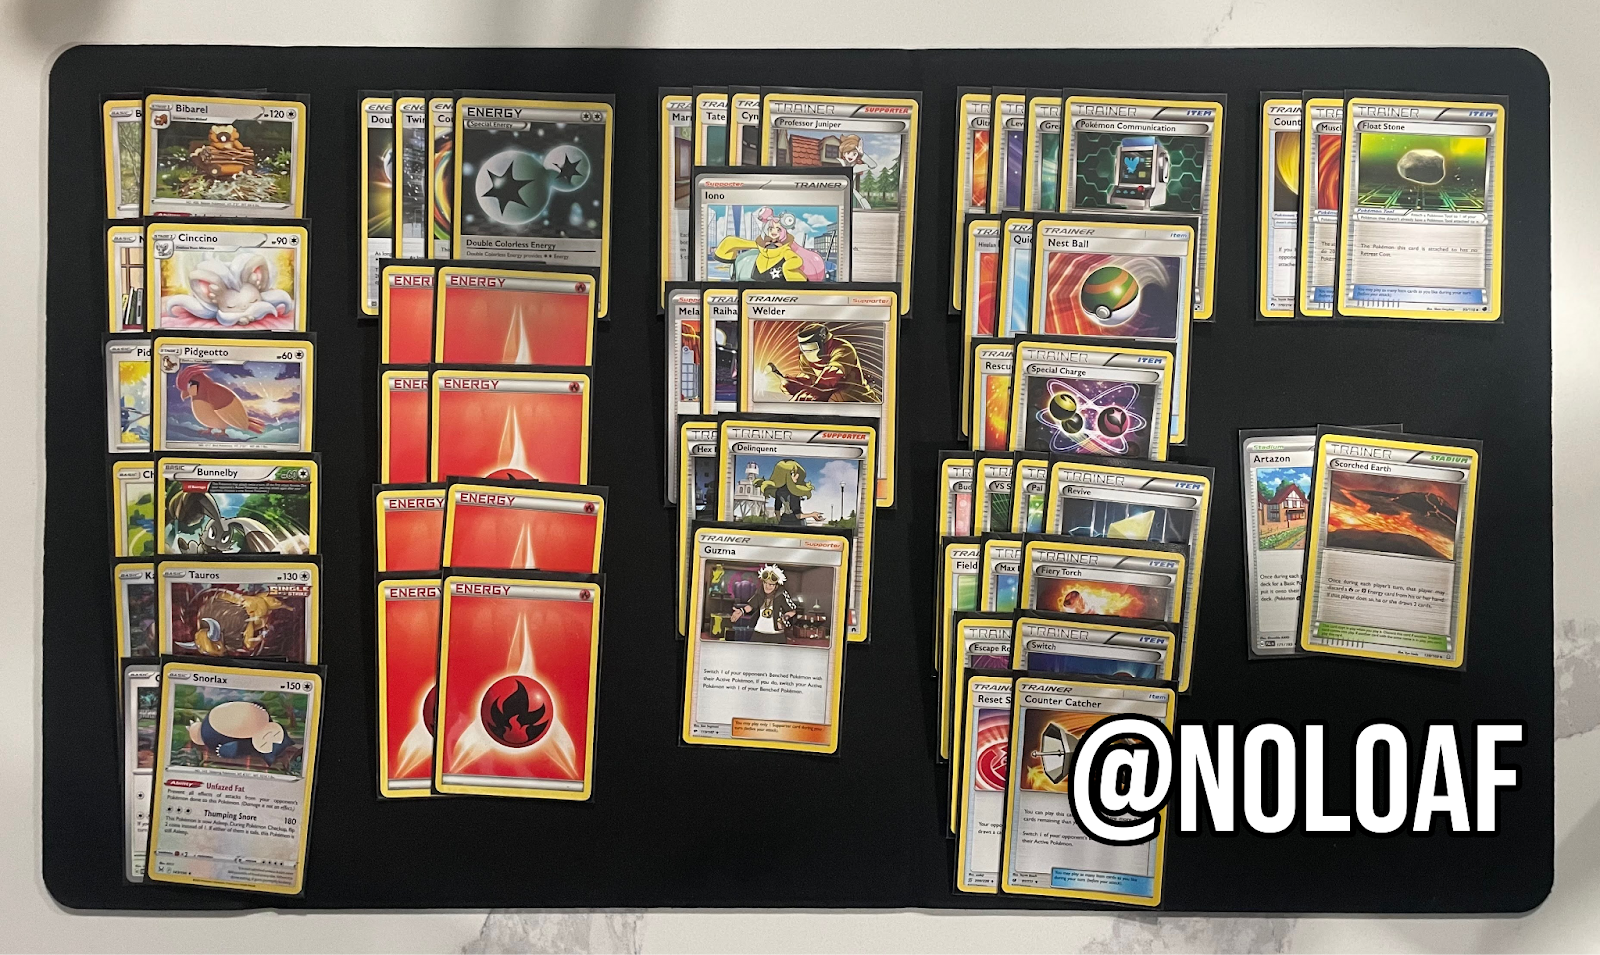
This is the list I won CBW GLC Webcam #83 with. As you can see, I have 1-1 lines of what I believe to be the best Draw Pokémon Colorless has access to, and Raihan and Mela were my choice of consistent Energy Acceleration. I also included what I believed to be the “sauce”, being Welder and Max Elixir. There was also a slight Control package in the deck, being Hex Maniac, Delinquent, and Reset Stamp, in order to win games where I knew I couldn’t take Six Prizes before the opponent and could mill them out using Bunnelby. It certainly wasn’t what the deck was best at, but it has won me games in tournaments where opponents were a bit too overzealous with their Energy placements or recklessly benched High Retreat Pokémon I could then repeatedly exploit using Counter Catcher.
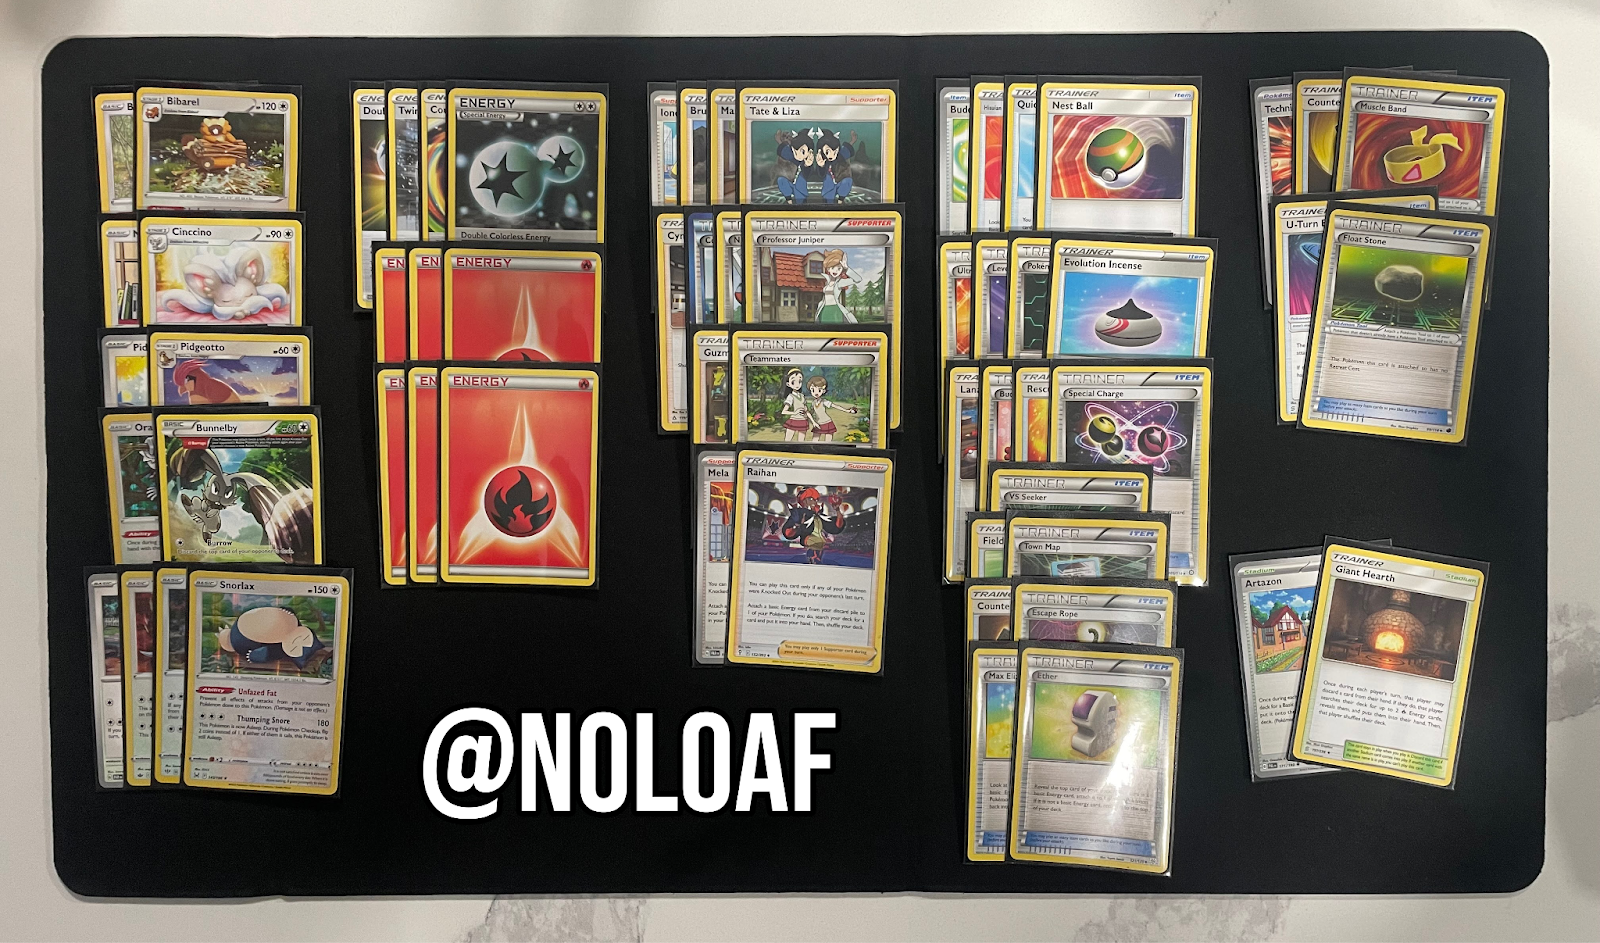
This is what I won my most recent local with however, so what gives? Why did I remove all the spice if I had seen so much success with it?
The main problem was the deck's consistency. I always make it a point to play the most low maintenance, most consistent decks as possible. Cards like Welder, Fiery Torch, and Scorched Earth completely spit in the face of that. While they did and still do make sense in the deck, all too often, I would find myself with hands with Welder and no Fire Energy, or multiple Fire, and no Welder. Meanwhile, in any other deck, that Supporter in my hand would most likely be an N or Cynthia, cards that don’t need other cards in hand in order to be played. If this were an actual Fire deck, I would most likely be playing 13+ Fire to facilitate these cards and it would feel fine. There simply isn’t enough space for more than 10 or so Fire in a list like this, so I found that the good games I played were really good, while the bad games I played were really bad. A key takeaway I’ve learned from good deckbuilders is that you want to build your deck to do one thing as best as possible. If I wanted to play cards like Welder and tons of Fire Energy, I should be playing Fire. But I have to remember, this is Colorless.
Another problem I had with the deck was that it was too Supporter reliant. With Pidgeotto, Cinccino, and Bibarel on board, you can see a ridiculous amount of cards per turn. Seeing 10+ cards though, still doesn’t guarantee you’ll find what you’re looking for, like a key Welder, Raihan, or Mela. And on these pivotal turns that I would whiff, I would have to concede that I wouldn’t be able to take a Prize Card, and would settle for shuffling back resources with Bunnelby to make finding the combo more likely next turn. And if I whiffed again, I would opt for “Plan B”, and begin trying to Control the opponent. I could have been stubborn, and added cards like Xtransciever and Pokégear 3.0 in order to mitigate some of the deck problems, but these cards still don’t guarantee finding the key Supporters needed for the deck to function. It would have simply been a ban-daid solution to the deck’s real problem. The list needed to change in order to be able to play a Draw Supporter and STILL be able to fulfill that sacred third Colorless cost on Pokémon like Snorlax and Cyclizar.
This is where I headed to PKMNCards.com. I looked through every single legal Item card that mentioned Basic Energy, and found Ether, Max Elixir (which to be fair, was already in the deck), Turbo Patch, and the recently released Energy Sticker. Here I found all the answers to my problems. With the likes of these, you can whiff cards like Welder, Raihan, and Mela, and be able to still play the Draw Supporters that had been constantly clogging my hands and find one of many Item Based Acceleration Cards. I opted to only play the cards whose effects I could guarantee through the use of Oranguru SSH, who has played a large part in perfecting the list. The “Monkey” allows you to place a Fire Energy on the top of the deck to confirm an Ether or Max Elixir hit, and even acts as a fourth consistency Pokémon. When not being used to accelerate Energy, Oranguru SSH can even serve as Marnie or Iono protection to combat one of the deck’s biggest weaknesses - Hand disruption
I played, and played, and played. I added Evolution Incense because I was losing games because I couldn’t evolve Bidoof. I lost games because of pricing key cards like Special Charge and Counter Catcher, which is why I added Town Map - A card that has since made it into every deck I own.
Now that I’ve discussed how I ended up on this list, let’s discuss some of my hot takes about Colorless.
Where is Skwovet?
I don’t personally like Skwovet, as I play Pidgeotto in its place. Skwovet is only good if you have Bibarel on Board, while Pidgeotto still lets you see two extra cards per turn even if he’s by himself. I believe that in GLC, you need to be able to amass a hand size of more than 5 because of cards like Hex Maniac, which would prevent you from announcing any of your abilities during your next turn. A list like this, playing Bibarel, Cinccino, and Pidgeotto, can easily end their turn with 7+ in hand, making you much less prone to Hex Maniac.
Where are the rest of your Special Energy?
Cards like Capture Energy, Strong Energy, and Therapeutic Energy are standard in “Turbo Colorless” lists like these. I don’t play these cards because I believe you only ever want to attach Double Colorless Energy/Counter Energy/Twin Energy/Double Turbo Energy for turn. If I’m not able to attach a Special Energy that provides Two Energy, I want the rest of the Energy in my deck to be able to be accelerated using Ether, Max Elixir, Raihan, and Mela, or be able to be found off Giant Hearth.
Where is Boss’s Orders?
I play Guzma in every deck, but opted not to play Lysandre or Boss’s Orders in this list, instead opting for Counter Catcher. In a list like this, where you’re likely using Raihan or Mela in order to respond to the opponent, you won’t be able to play Guzma or Boss’s Orders that same turn. Counter Catcher lets you do exactly that, as well as letting you be able to gust on turns where you need to Cynthia or Bruno into a Fire + Ether or Max Elixir Combo.
No Instruct Oranguru?
This choice is most understandable, as the deck's entire identity is tied to Oranguru SSH as he’s the only way to consistently set up Ether and Max Elixir.
Now that I’ve discussed how I arrived at the list, let's take a look at some of the Pros and Cons I have with it and some tips I have on piloting a deck like this.
Reasons to play this list, and Colorless in general:
- Excessive amounts of Support Pokémon
- Comeback potential in the form of Bunnelby & Technical Machine: Crisis Shot
- Access to alternate Win Conditions using Rototiller
- The ability to donk using Tauros or a lucky turn one Double Colorless + Ether/Max Elixir combo
- Snorlax is a 150HP Basic that has the damage output of a Stage 2. As well as having a built in Mist Energy, making it immune to all effects of attacks excluding damage. This can be nasty for Lost Zone Psychic to deal with, as Snorlax is immune to Sableye’s Lost Mine, forcing your opponent to play Silent Lab or Hex Maniac to be able to target it
Cons of the list:
- Prone to hand disruption. Nothing feels worse than holding onto Raihan, or Fire and Ether/Max Elixir in hand, only for it to be shuffled back into the deck the turn prior. Bibarel thankfully acts as an outstanding N and Iono protection during the late game though, so you’ll oftentimes be able to draw back into the cards that had just been shuffled in. Can’t forget about Primate Wisdom either!
- No Bench Barrier. Your Support Pokémon will have a huge target on their heads from the likes of Raikou VIV, Galarian Articuno CRE, and Kyogre CRZ. Try to set up your Support as soon as possible to be able to draw into Buddy-Buddy Rescue, Rescue Stretcher, and Lana’s Fishing Rod to be able to retrieve them from the Discard Pile the exact turn they are killed
- Spread can play around Raihan and Mela by not taking KO’s. In matchups like these, you need try and rush Six Prizes as soon as possible and avoid putting low HP Pokémon (such as Pidgeotto and Bunnelby) into play unless you absolutely have to
- Pokémon that Snorlax can not OHKO. Don’t be afraid to settle for a two shot, especially if the offending Pokémon has Luxurious Cape attached. But certain Types, such as Metal, can utilize their host of Tool Cards that will take them above the threshold that even Snorlax + Muscle Band can’t reach. In matchups like these, it’s important to hold onto Field Blower, played Guzma and Counter Catcher to keep drawing Prize Cards, and try to setup the Bunnelby + Crisis Shot which can KO almost every Pokémon in format, even with Luxurious Cape attached, for the last two prizes
It’s been an honor to have written this article for CBW, and I would love to thank everyone at my LGS for always being willing to bounce ideas off and provide me intense competition in order to stress test my list. I hope you all enjoy playing Colorless!
Written by: @NOLOAF
Images by: @Whimsicast
Deck Lists
First deck:
- 1 Snorlax LOR 143
- 1 Pidgeotto TEU 123
- 1 Pidgey SV3PT5 16
- 1 Cinccino SSH 147
- 1 Minccino BRS 124
- 1 Bibarel BRS 121
- 1 Bidoof CRZ 111
- 1 Bunnelby PRC 121
- 1 Farfetch'd TEU 127
- 1 Kangaskhan DAA 133
- 1 Tauros CRE 115
- 1 Cyclizar SV4 157
- 8 Fire Energy BLW 106
- 1 Double Colorless Energy NXD 92
- 1 Counter Energy CIN 100
- 1 Twin Energy RCL 174
- 1 Double Turbo Energy BRS 151
- 1 Professor Juniper BLW 101
- 1 Hex Maniac AOR 75
- 1 Delinquent BKP 98
- 1 Guzma BUS 115
- 1 Cynthia UPR 119
- 1 Tate & Liza CES 148
- 1 Welder UNB 189
- 1 Marnie SSH 169
- 1 Raihan EVS 152
- 1 Iono SV2 185
- 1 Mela SV4 167
- 1 Pokémon Communication BLW 99
- 1 Revive BLW 102
- 1 Switch BLW 104
- 1 Great Ball BCR 129
- 1 Level Ball NXD 89
- 1 Ultra Ball DEX 102
- 1 Escape Rope PLS 120
- 1 Fiery Torch FLF 89
- 1 Pal Pad FLF 92
- 1 VS Seeker PHF 109
- 1 Buddy-Buddy Rescue BKT 135
- 1 Max Elixir BKP 102
- 1 Special Charge STS 105
- 1 Nest Ball SUM 123
- 1 Field Blower GRI 125
- 1 Rescue Stretcher GRI 130
- 1 Counter Catcher CIN 91
- 1 Reset Stamp UNM 206
- 1 Quick Ball SSH 179
- 1 Hisuian Heavy Ball ASR 146
- 1 Float Stone PLF 99
- 1 Muscle Band XY 121
- 1 Counter Gain LOT 170
- 1 Scorched Earth PRC 138
- 1 Artazon SV2 171
Second Deck:
- 1 Snorlax LOR 143
- 1 Pidgeotto TEU 123
- 1 Pidgey SV3PT5 16
- 1 Cinccino SSH 147
- 1 Minccino BRS 124
- 1 Bibarel BRS 121
- 1 Bunnelby PRC 121
- 1 Oranguru SSH 148
- 1 Kangaskhan DAA 133
- 1 Tauros CRE 115
- 1 Cyclizar SV4 157
- 6 Fire Energy BLW 106
- 1 Double Colorless Energy NXD 92
- 1 Counter Energy CIN 100
- 1 Twin Energy RCL 174
- 1 Double Turbo Energy BRS 151
- 1 Professor Juniper BLW 101
- 1 N NVI 92
- 1 Colress PLS 118
- 1 Teammates PRC 141
- 1 Guzma BUS 115
- 1 Cynthia UPR 119
- 1 Tate & Liza CES 148
- 1 Guzma & Hala CEC 193
- 1 Marnie SSH 169
- 1 Bruno BST 121
- 1 Raihan EVS 152
- 1 Iono SV2 185
- 1 Mela SV4 167
- 1 Pokémon Communication BLW 99
- 1 Level Ball NXD 89
- 1 Ultra Ball DEX 102
- 1 Town Map BCR 136
- 1 Escape Rope PLS 120
- 1 Ether PLS 121
- 1 VS Seeker PHF 109
- 1 Buddy-Buddy Rescue BKT 135
- 1 Max Elixir BKP 102
- 1 Special Charge STS 105
- 1 Nest Ball SUM 123
- 1 Field Blower GRI 125
- 1 Rescue Stretcher GRI 130
- 1 Counter Catcher CIN 91
- 1 Lana's Fishing Rod CEC 195
- 1 Evolution Incense SSH 163
- 1 Quick Ball SSH 179
- 1 Hisuian Heavy Ball ASR 146
- 1 Buddy-Buddy Poffin TEF 144
- 1 Float Stone PLF 99
- 1 Muscle Band XY 121
- 1 U-Turn Board UNM 211
- 1 Technical Machine: Crisis Punch SV4PT5 90
- 1 Giant Hearth UNM 197
- 1 Artazon SV2 171
- 1 Bidoof CRZ 111