GLC Drapion Psychic Deck


Paralyzing Arcana
The write-up for this deck is past due. It’s one of the decks I have played for the longest time and one of my favorites. A while ago, I was trying to find the best way to power up Drapion, which has a massive 4 psychic energy cost. Do you play the Psychic Mirage energy-doubling Gardevoir, or is Shining Arcana better? At the time, Gallade wasn’t an option.
After playing Mahone’s “Garde-Malamar” list on the gymleaderchallenge.com website, I soon found my answer. Unfortunately, the list is no longer there, but I found it was more consistent than the builds I came up with. Since then, Hisuian Heavy Ball and Kirlia have been released, making the deck even better.
When I was still a new player, I struggled a lot. My support Pokémon would get gust-KO’d, leaving me in a bad spot. This deck is designed with as much flexibility as possible to execute several contingency plans. It also tries to slow the opponent down, giving you the upper hand either out of the gate or even in the middle of the match.
Sometimes the deck has a slow start, but you’ll never be out of the game. When Kyogre was in its prime, this deck could contend with it even without a bench barrier.
Due to the high energy cost, Drapion is not a popular pick. Neither is Gardevoir since the release of Gallade. Because I’m the only one playing it, there aren’t many placements with the deck, but I usually always go 3-2 with it online and once got an impressive 2nd place finish. Even when this deck loses, it usually makes for a great story. I hope this write-up inspires others to play Drapion (or even Gardevoir or Articuno) and show how successful it can be.
Opening Plays
There are only 13 Pokémon in this deck. This number isn’t unusual by any means, but it is certainly lower than average. Realistically Articuno and Giratina are going to be your first attackers. It is not uncommon to take the majority of prizes with these two, as they are both easy to recycle.
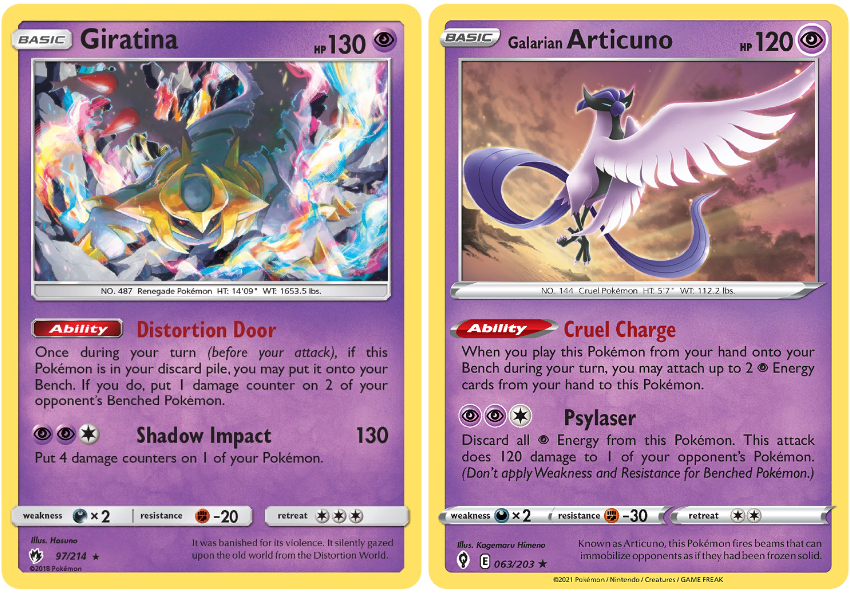
It is possible to attack early because of Dimension Valley and Articuno, but these may be somewhat risky plays. There is no stadium recovery, so once the Dimension Valley gets bumped, you won’t be able to use it again. Playing Articuno early may mean not setting up other Pokémon if you have to use the fog crystal. On the other hand, playing Articuno early may be what you need to buy time.
Do not underestimate Ralts’ Confuse Ray attack or Skorupi’s Hone Claws. Skorupi threatens a KO, and both options may force your opponent to play a switch. Removing this switch can pay off later in the game.
The most optimal 4-Pokémon setup for you often involves having Wobbufett in the active with Musharna, Kirlia, and an attacker on the bench. Malamar can enable some plays, but it’s usually not worth it early from my experience because there isn’t enough energy in play yet, you see fewer cards, and the opponent may target it. Having Malmar early is much more important if you’re attacking with Articuno early. In this case, you can accelerate the energy immediately, and your opponent probably won’t be able to knock it out.
I prefer prioritizing both draw support since the draw compounds over a couple of turns. You’re going to be able to play a lot of the cards down and may get an explosive Erika’s Hospitality for 5-6, then draw 3 with your support Pokémon for a combo that enables an attack. The most deadly combo is Parallel City + Articuno. An early Parallel City and Articuno won’t happen every game, but still, such explosive draws will enable combos and put you in a position where it is difficult for the opponent to disrupt you.
Mid-game
Once you build your board, there are many options available. Some games, you can simply ignore the active Pokémon and snipe or boss all of your opponent’s support Pokémon. You’ll keep trading with them, but over time you whittle your opponent’s options away, then N your opponent to a low hand size. Articuno snipes 120 damage, but it is possible to reach 170 with Spell Tag and Giratina’s ability in some circumstances.
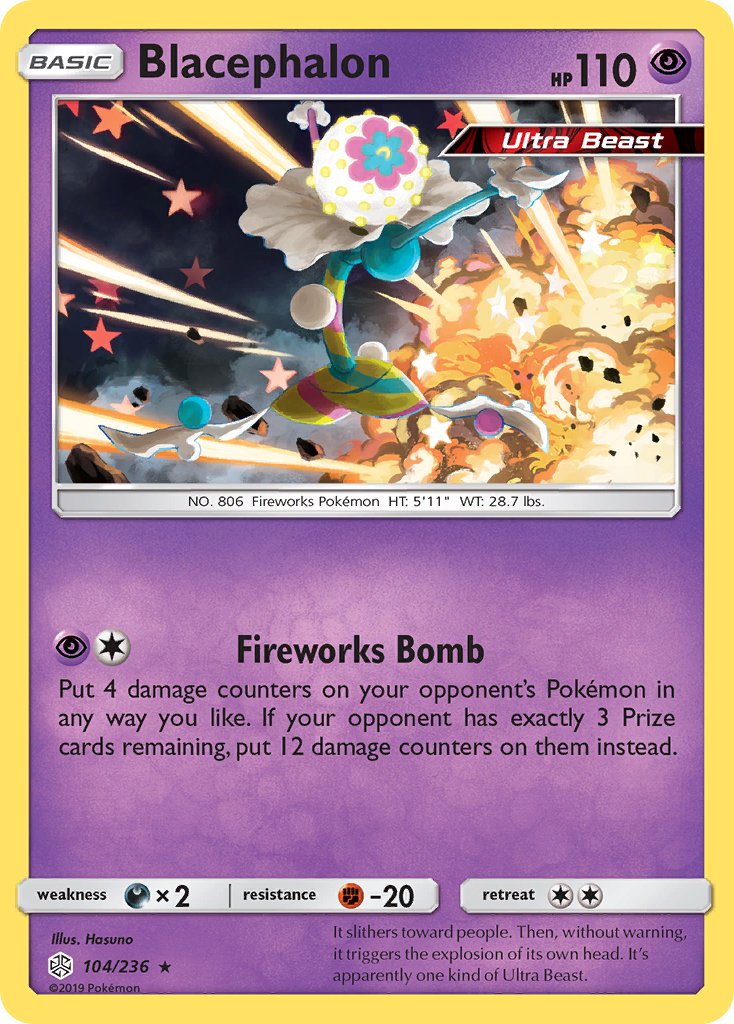
The three-prize turn is going to be the most significant turn. If you can attack with Blacephelon on the three-prize turn twice, the game is probably over for your opponent. Blacephelon is an excellent way to take multiple prizes. Giratina’s ability can catch your opponent off guard, making it that much easier to get a multi-prize KO.
Blacephelon is pivotal for the deck to function. In addition to what it places on the board, it being an efficient attacker allows you to store extra energy on your other Pokémon. Blacphelon can fix math for Drapion getting a knockout with poison or getting a knockout going into your turn (assuming they can’t find a switch). The best part is that you get to choose depending on the situation.
Playing Blacephelon early will often cause the opponent to target it, which equals more energy on board for you. Recovering Blacephelon shouldn’t be a problem. Your opponent could prioritize attacking Drapion, but they usually won’t due to the pressure the other attackers put on. Malamar, Blacephelon, and Gardevoir are the most common boss targets.
It’s generally easy to recover Malamar and Gardevoir as well by using Klara or another recovery card + a basic search followed by Klara later. Klara can recover half a line and set up Articuno in the same turn. It is not uncommon to recover basics with Brigette since there will be enough energy in play, and no draw supporters need to be played either.
As in any deck, paying attention to recovery cards is important. Playing recovery cards as late as possible is generally recommended. You don’t want to dilute the deck; you may want to recover a Pokémon that is currently in play; waiting gives you the ability to recover more later and overall gives you more options. Recovering only energy with Super Rod or putting a Pokémon into the hand with Rescue Stretcher are strong effects.
Why Drapion?
The most likely criticism of this deck is the Drapion, which is understandable given the attack cost. I found it tricky to replace because attackers like Necrozma or Golurk require special energy or tool cards that take up space. Special energy doesn’t synergize well with Malamar or Articuno. You can make space for the cards you need, but in the end, it shapes a deck with a separate identity. Constructing the deck anew, I might try CRZ Mewtwo (recent as of this writing), but again it would lead to a different deck. Let’s focus on Drapion.
One reason to play Drapion is that nobody respects it. The number of unique decks in GLC means there will be plenty of exceptions, but a lot of lists do not play item switching cards, preferring tool cards or supporters instead. The opponent will not be able to play Teammates or Raihan to get around Drapion’s paralysis, so they will generally want a switch and a pivot instead of being able to switch into a new attacker. Guzma and Escape Rope are the two most popular switch cards, but neither allows the opponent to knock out Drapion.
Drapion being pushed to the bench is not bad because it gives you another chance to get the paralysis off. You only need the attack to stick once for it to be worth it, and if you can eliminate all of the opponent’s switch cards, then Drapion can be enough to secure every remaining prize.
Getting your opponent stuck does more than give you a free attack. It also gives you more turns of abilities and supporters, which may allow you to set up checkmate. The board can be so strong at times that manually retreating Drapion and using it again later is an option.
Although I speak highly of it, it must be acknowledged that sticking paralysis is a challenge. The best way to ensure it sticks is to remove the draw support Pokémon then play N. You will have to put at least one energy on Drapion in advance so that Raihan is not needed. You generally don’t need to accelerate all of the energy at once. The goal should be to get extra energy attachments here and there using Gardevoir or Dimension Valley.
It should also be mentioned that a number of decks have ways to deal with Drapion’s Paralysis. VIV Wailord for instance, can be healed from paralysis if an energy gets attached to it. This doesn’t make Drapion worthless; you just need to play the game well enough to respect the opponent’s options. The primary way to deal with threats is to target them or the support beforehand, which you can do often enough. In most games, Drapion is more of an option than a primary attacker. If you get ahead, you can usually continue trading until you win. However, if your opponent has no more Pokémon on the bench, you will need to KO the active. Drapion and Gardevoir are both great finishers.
Most of the discussion around Drapion pertains to taking advantage of paralysis, but getting a knockout with poison into the opponent’s turn can also be a good idea. Poison knockouts prevent the opponent from playing Raihan or Teammates, which may cause the opponent to whiff an attack.
In dire situations, Drapion is the ultimate comeback card because it can set up damage on several Pokémon, ready for Blacephelon to sweep. Drapion allows Blacephelon to be a threat even if it isn’t the three-prize turn. The synergy Drapion has with Blacphelon is subtle yet strong.
Tips and Tricks
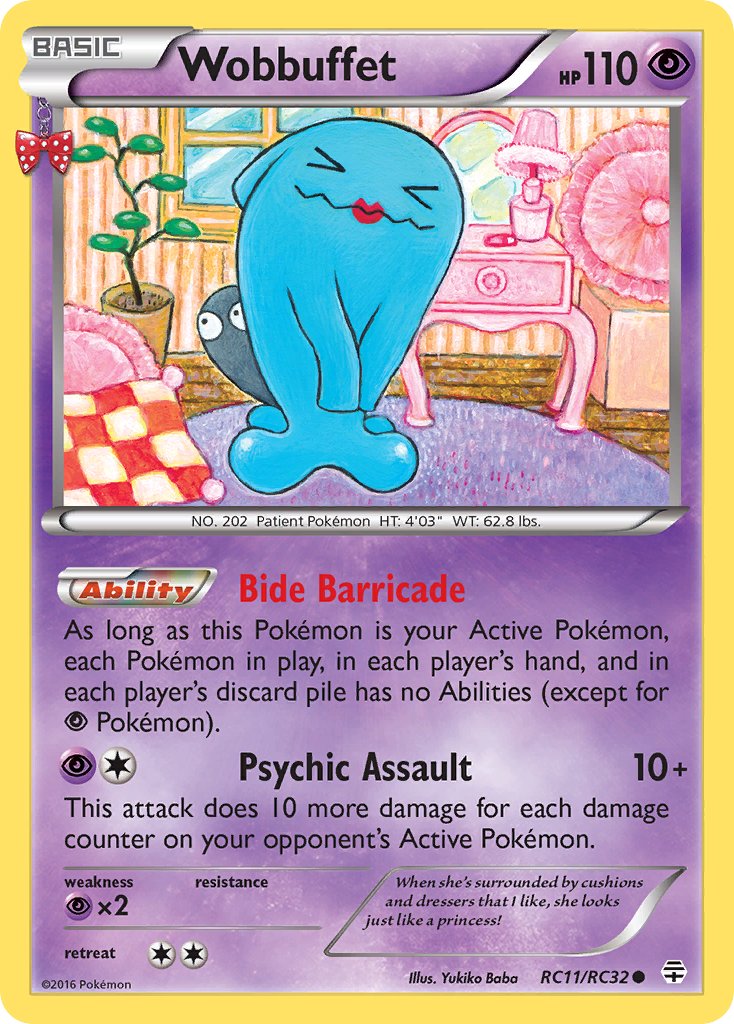
- Set up a KO for Wobbuffet
This is another way to save on energy attachments, but you also ability lock your opponent in the process. Wobbuffet rarely has the ability to do this, but it is an important option to consider nonetheless. It is more likely to come up versus low-HP decks where Drapion is less effective.
- Save the rare candy
Rare candy is best played to recover the Gardevoir in the middle of the game. Aside from being the only attacker that hits big numbers, Gardevoir is the only way to accelerate 4 energy in a turn. Using Kirlia allows you to thin the deck, and Kirlia will enable you to draw 4 cards total upon evolving into Gardevoir. Evolving into Gardevoir using Kirlia is more challenging as the game progresses.
- Using Shining Arcana
Keeping a count of your energy allows you to make informed plays, increasing the odds of getting a hit off Shining Arcana. If there is no energy in hand to attach at the start of the turn, it is best to use Shining Arcana first, then Mushara to increase the number of cards seen. Otherwise, it is often nice to check with Musharna first to thin a card that isn’t energy. Whiffing one turn is fine; it makes energy acceleration more likely to hit the next turn. Accelerating energy is inevitable. Super Rod is a great way to increase the odds of accelerating energy and can even be guaranteed if the deck is small enough.
- The deck is built for Articuno
Scoop Up Net, Klara, and VS Seeker (for Klara) are all easy ways to recover Articuno. You may need these cards for other things or may instead be able to play Articuno again using Rescue Stretcher. The point is, you’re going to have a lot of options for attacking even without Malamar. The deck also features a high number of switch cards so that you don’t drop an attack.
- The deck has three tool cards
Most decks only play Field Blower to remove tool cards. Setting up a pivot for the remainder of the game is easy. Spell Tag may force your opponent to play Field Blower early, or if the opponent plays Field Blower early anyway (it happens often enough), you can guarantee 4 damage counters anywhere which is very strong.
Cards to Consider
- Multi-Switch
Multi-Switch is a card that will make your opponent say, “What is Multi-Switch and why did I lose to it?”. (Credit to JW Kriewal for tweeting this, I’d link to it if I could find the tweet.)
This card was in a previous version of the deck. It allows you to accelerate 4 energy to Drapion in one turn without Gardevoir (Raihan, Malamar, attach, Multi-Switch). It also allows you to use Mystery Energy as a pivot before using it as an energy or to use it as a pivot if the opponent tries to stall. The best argument for using Multi-Switch is that it gives redundancy. If Malamar gets boss-KO’d, you still have options (the deck is already built with this mentality).
- Escape Rope
Combining Escape Rope with Parallel City is strong, and most decks play Escape Rope over Switch. However, I prefer a plain Switch in this deck because Escape Rope cancels Ralt’s Confuse Ray attack, and the opponent could sack a Pokémon with 100 or less HP on a turn you want to swing with Drapion. Still, it has some potential in the deck because of the opponent’s limited bench size.
- Silent Lab
Silent Lab is not a card I would include, but I’m mentioning it since someone else might think of it. Bench Barrier is not an issue the deck faces. Both Manaphy and Mew have low HP, so they can be targeted by Blacephelon easily.
They also limit your opponent’s bench, which can be restrictive with Parallel City. Does the opponent limit themselves to Bench Barrier + 2 Pokémon, or would they rather have 3 Pokémon and allow you to snipe any of the remaining three?
Matchup Spread
The deck has a reasonably even MU spread across all types, but there are some weaknesses.
The biggest issue comes if the opponent can play around Blacephalon by taking multiple prizes. Many decks can do this, but Articuno can make it harder for the opponent. Lost-Zone Psychic is the worst matchup. Giratina not only helps your opponent, but they can be precise when placing damage counters. Other psychic decks can’t be slowed with Wobbuffet.
Dark is the second-worst MU. Not specifically because of weakness, but Guzzlord has a lot of HP and can manipulate the three prize turn. Dark players have a 4-prize turn and a 3-prize turn for Beast Ring as opposed to just your 3-prize turn. Blacphalon cannot easily take advantage of the low HP of Dark’s Pokémon because Guzzlord is a threat. Attaching to Drapion can sometimes be optimal if the opponent is going for an early Guzzlord.
There may be a scenario where you have to allow Guzzlord to take 4 prizes. The goal is to remove all of the opponent’s low-HP attackers with Blacephalon, take out Guzzlord, then sweep. The challenge of playing an accelerated game in this way means you won’t reach the bottom of the deck. I managed to win at least once this way.
The deck struggles versus very early pressure. Setting up simply gives the most options. A few cards aren’t very active to start, like Klara.
Metal decks are more likely to play extra switch through Mallow & Lana and play more stadiums. Field blower is usually enough to deal with an opposing Parallel City, but not when the opponent has Lusamine, Cynthia & Caitlin, and Dialga. A healing stadium sticking could cause issues too.
Gallade and Dragonite allow your opponent to navigate Drapion’s paralysis. They are not guaranteed to have the right combination of cards, but it makes sticking the paralysis harder. That said, Dragon is very workable since you can force the opponent to mill themselves with Garchomp.
The Thumping Snore Snorlax poses a threat because you cannot apply status conditions or place damage counters on it from an attack. It can also be recycled. VIV Wailord can similarly heal from status conditions, or Wash Energy (preventing damage counters) may be in effect, though I don’t recall either being problematic.
Fighting decks often play Machoke which prevents bench damage and damage counter placement. It could win the game for your opponent, but it depends since you can simply boss-KO the Machoke. You have more consistency mid-game than your opponent; early pressure from the opponent is more impactful.
Control is a “free” MU. There are 6 outs to switch cards and three outs to cards that enable free retreat. You can snipe the opponent’s bench to disrupt them. Fire Mill is more stressful, but the deck should have the resources to deal with it.
The more you play these matchups, the more you’ll understand how to deal with various threats.
Final Thoughts
Given some of the restrictions and weaknesses, this deck is certainly not perfect. However, I keep returning to it. It was built to counter ability-reliant decks and continues to be strong.
This deck developed my playstyle, and it’s a lot of fun showing it off to people since I am essentially the only player to run Drapion. I hope this write-up inspires others to play the deck or include parts in their own builds. If you enjoy tricky plays, mapping your prizes, and resource management, then this deck is for you.
Overall, it is a good reminder to experiment with cards that nobody else plays. What you try may just work!
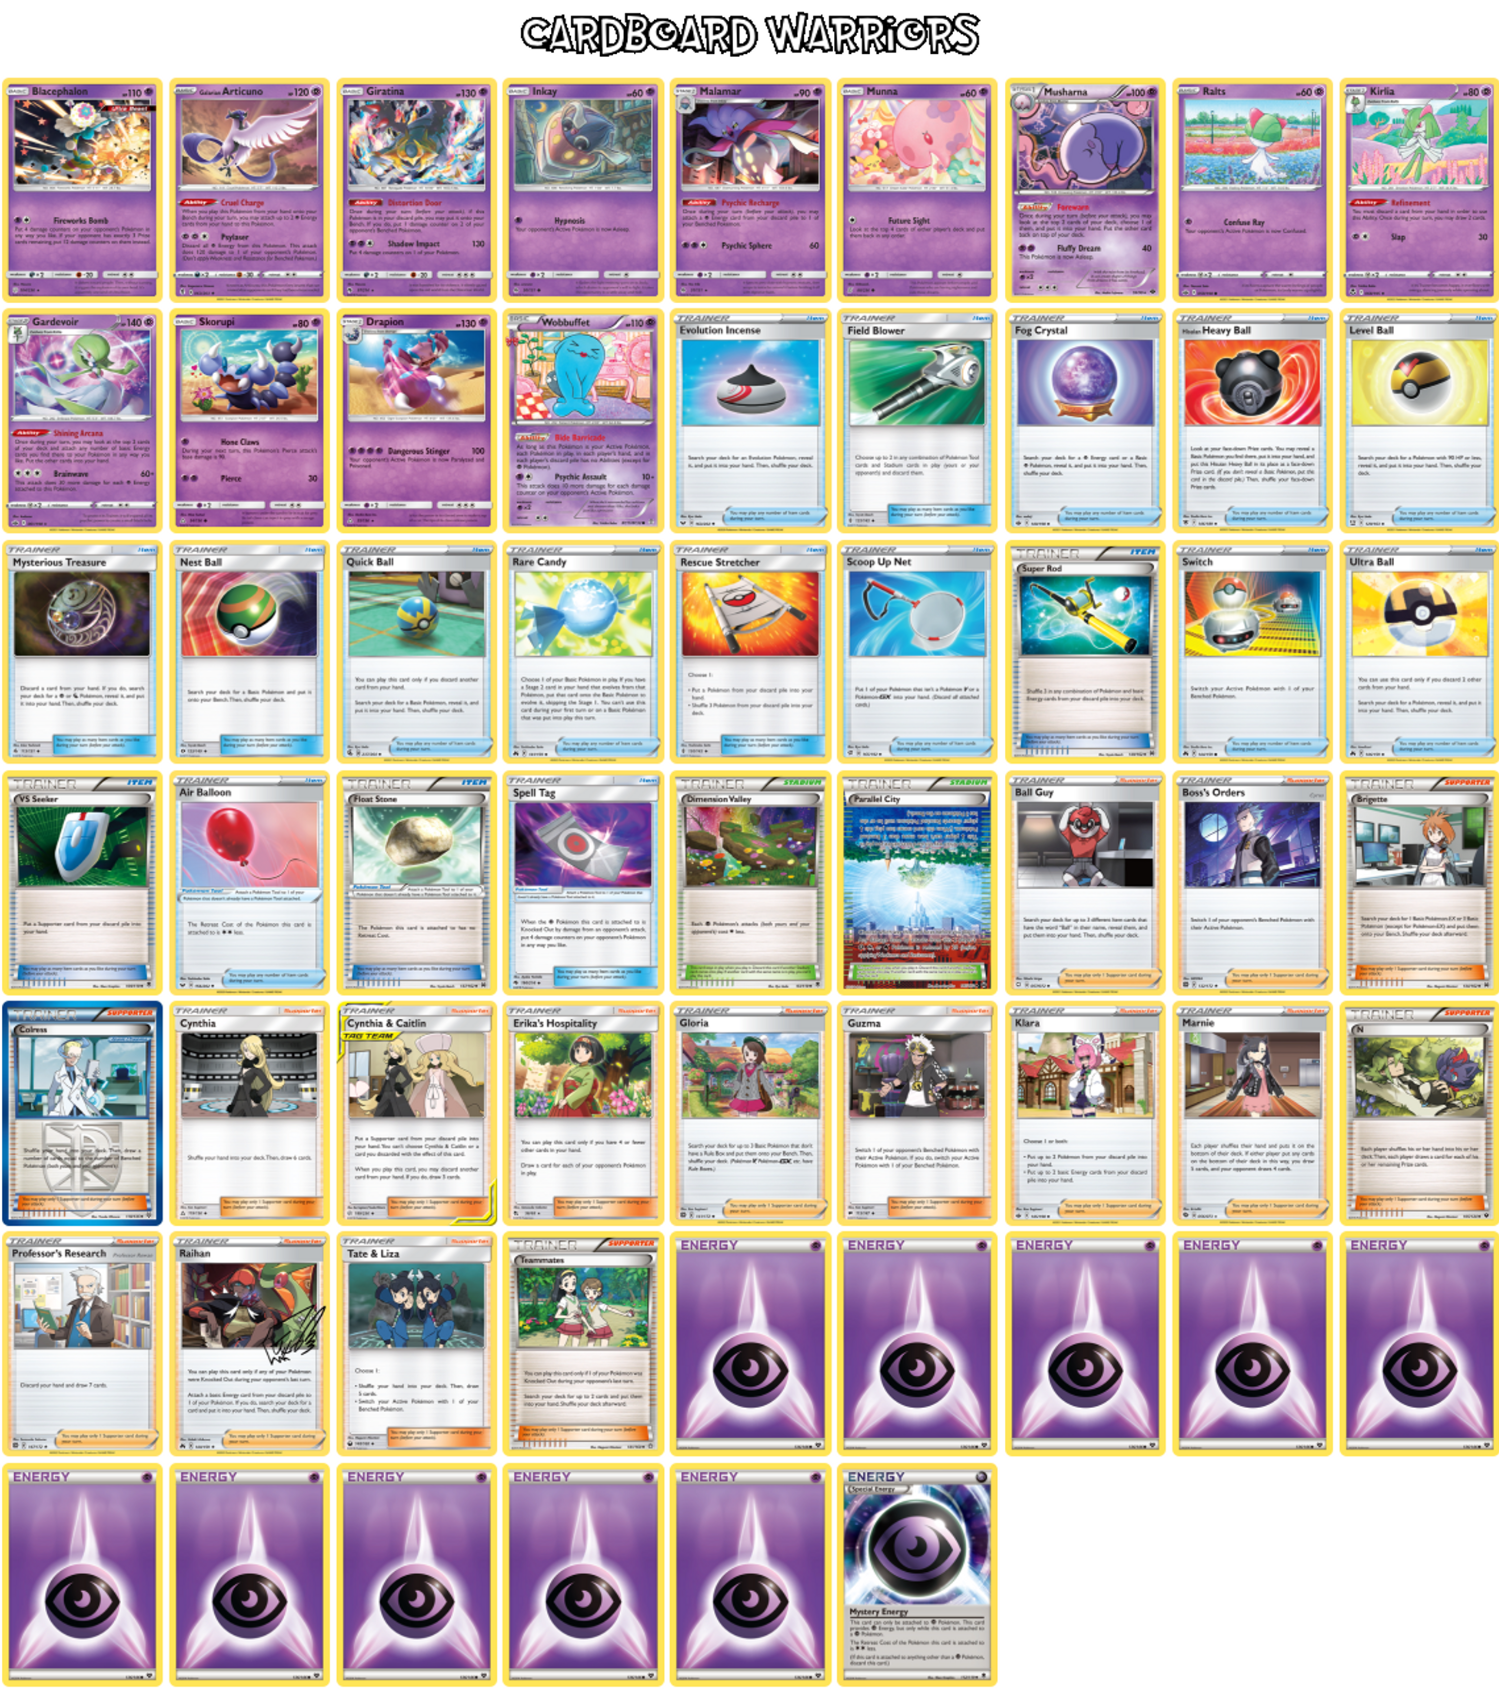
Deck List