GLC Turbo Water

Wet Boy Summer
Hello Cardboard Warriors! My name is Marimbist11, and I’ve been playing GLC for about 5 months now. I’ve always loved card games and Pokemon, but only recently started playing the TCG after hearing about the GLC format, which piqued my interest.
Overview
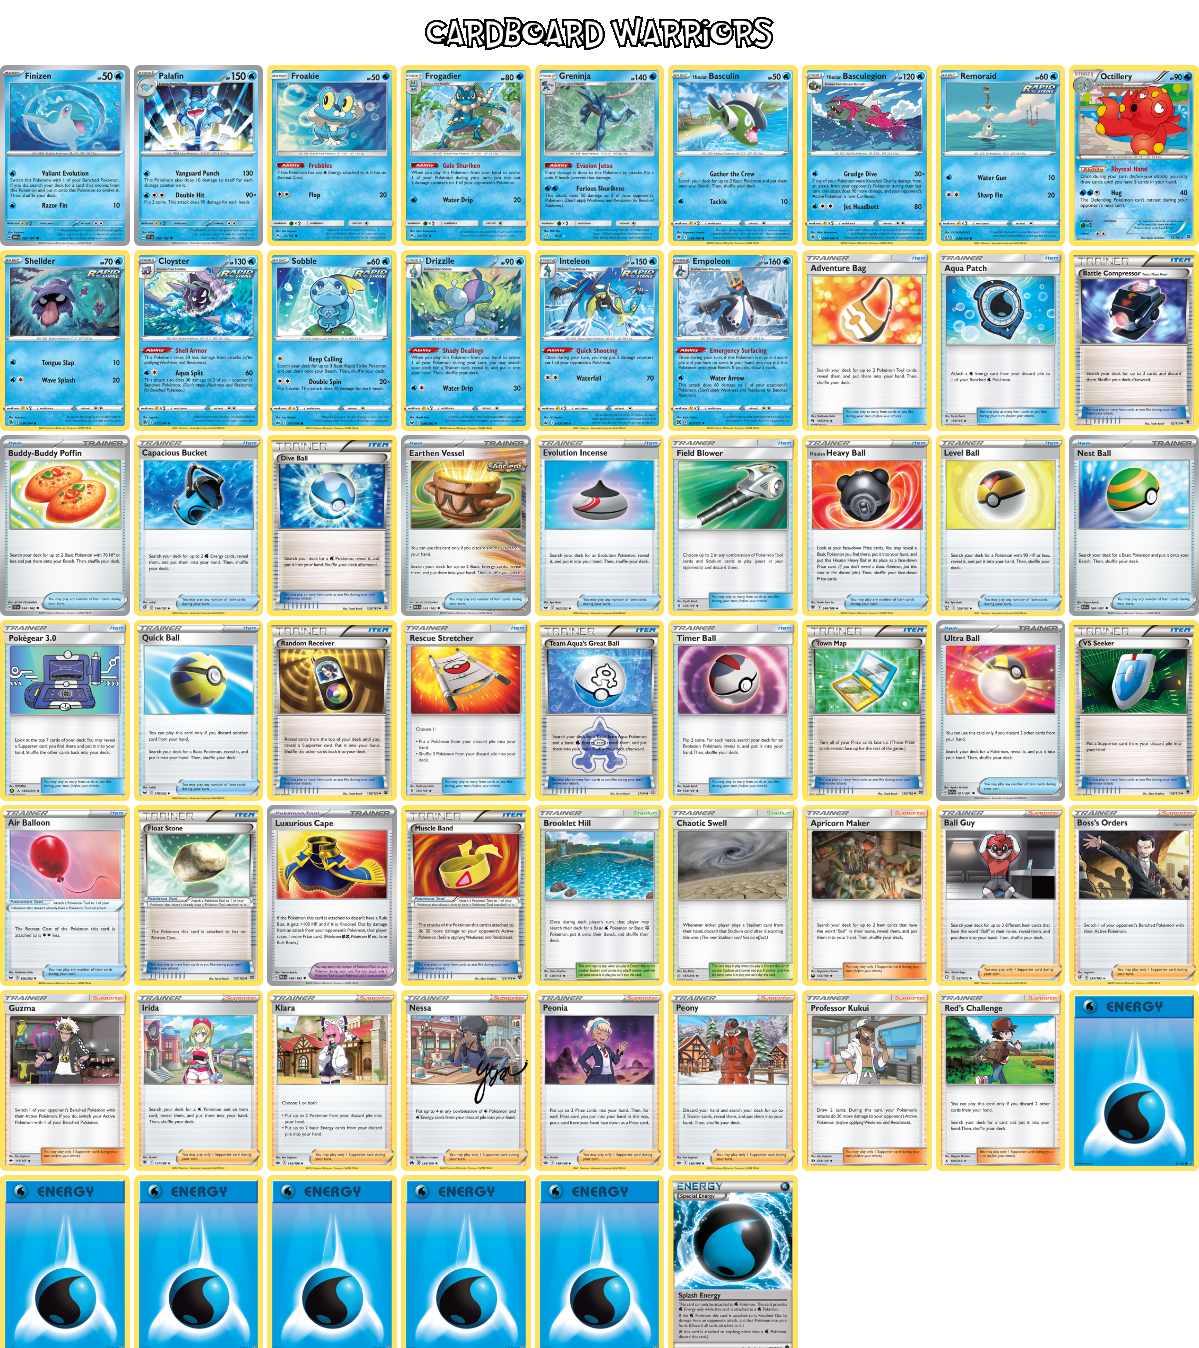
After some early exploration of the format, I quickly settled in on enjoying aggressive stage 1 attackers. Their inherent strength when going first is a great punish for the popular choice to go second in this format, which really adds to a deck’s capabilities. I built this deck with consistency and redundancy at the forefront to minimize the risk of non-games or bad prizings. No fancy opening gambits, no elaborate energy combos. Just reliable setup, low maintenance powerful attacks, and enough redundancy to always be in the driver’s seat.
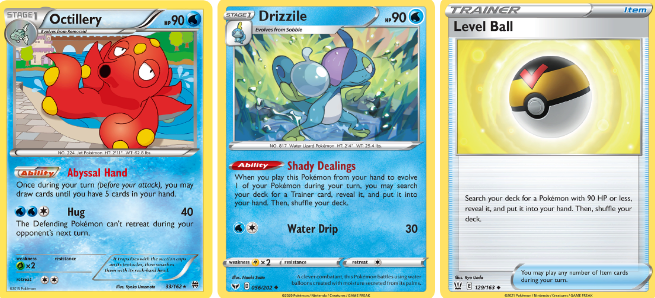
When it comes to consistency, Water stands out among the other types due to one major advantage; 90HP card draw pokemon, namely Shady Dealings Drizzile and Abyssal Hand Octillery. Many decks have to use costly balls like Ultra Ball or the unreliable Timer Ball to access key stage 1 supports like Grotle or Liepard, but not Water. This gives the type a distinct advantage of easy reliable setup, and I lean quite hard into this specific Level Ball threshold to make the deck run. This is obviously no big surprise to anyone who has played as or against Water before, but I wanted to push this advantage further.
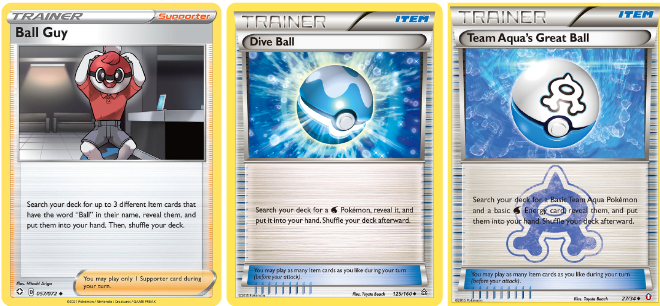
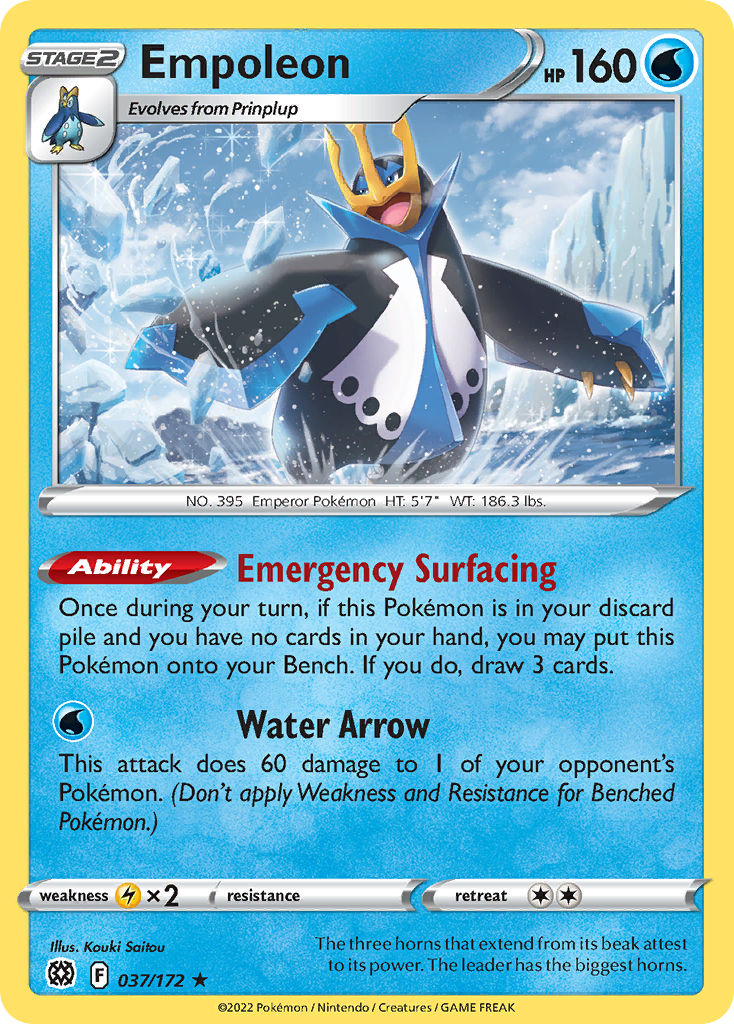
Enter Ball Guy and Apricorn Maker. A supporter so good in this deck that you can run the weaker version with no issues. On top of exploiting some of the best Level Ball searchable consistency pokemon, Water also has the premium Dive Ball, and the more obscure Team Aqua’s Great Ball. Being able to grab energy from these premium setup supporters is another big advantage this deck has. Playing a Ball Guy can let you start attacking very quickly with Palafin or Cloyster while also establishing your other evolution lines. It is role compression at its finest, and the synergy doesn’t stop there. Quick Ball and Ultra Ball’s discard costs are leveraged in a couple different ways in this deck. They can help trim down your hand size to make more room for Abyssal Hand draw, and they also can pitch Empoleon into the bin. Empoleon further adds to the consistency engine and low maintenance attacking plan by offering a strong mitigation of a Peony/Red’s Challenge hand dump, and a very solid 1 energy snipe attack. Searching for whatever you want is of course a powerful effect, and thanks to Empoleon and Octillery, it is very easy to draw back up from these power plays and keep up the relentless pressure.
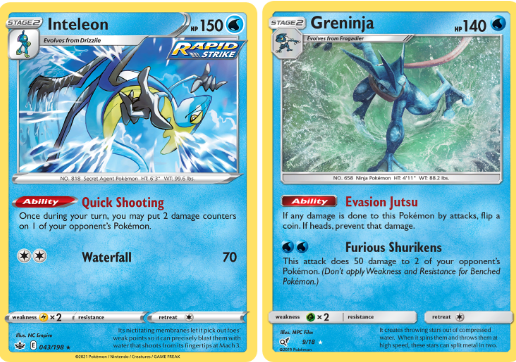
Finally the deck rounds out with some powerful spread damage pokemon in Inteleon and Greninja. While many Water decks opt for Shady Dealing’s Inteleon, I much prefer the Quick Shooting Inteleon in this list. I find that I have tremendous speed and consistency with Drizzile and Octillery already, and Quick Shooting directly compliments my spread damage attacks, or even just helping Palafin take out extra tanky targets. It is able to do all of this without budgeting any energy into it, unlike Shady Dealings’ 2 energy attack, thus keeping my focus on my already strong lineup of attackers and letting Inteleon chip away in the backline. Quick Shooting has incredibly relevant math fixing with Greninja, and my offense is usually too threatening to allow my opponents to Boss up Inteleon. I have almost never seen it get KOed, and it just keeps chipping turn after turn for no investment. Lastly, Greninja is the ultimate checkmate attacker of the deck, cashing in all of your spread damage chips throughout the game into KOs. Evasion Jutsu is simply unfair, and your opponent often has no choice but to attack into it and hope they hit. If they get the KO on Greninja, it is okay; Nessa and Klara are here to deploy repeated follow up Palafins and Basculegions to revenge KO. And if they don’t hit Greninja? GG.
Strategy
Going First
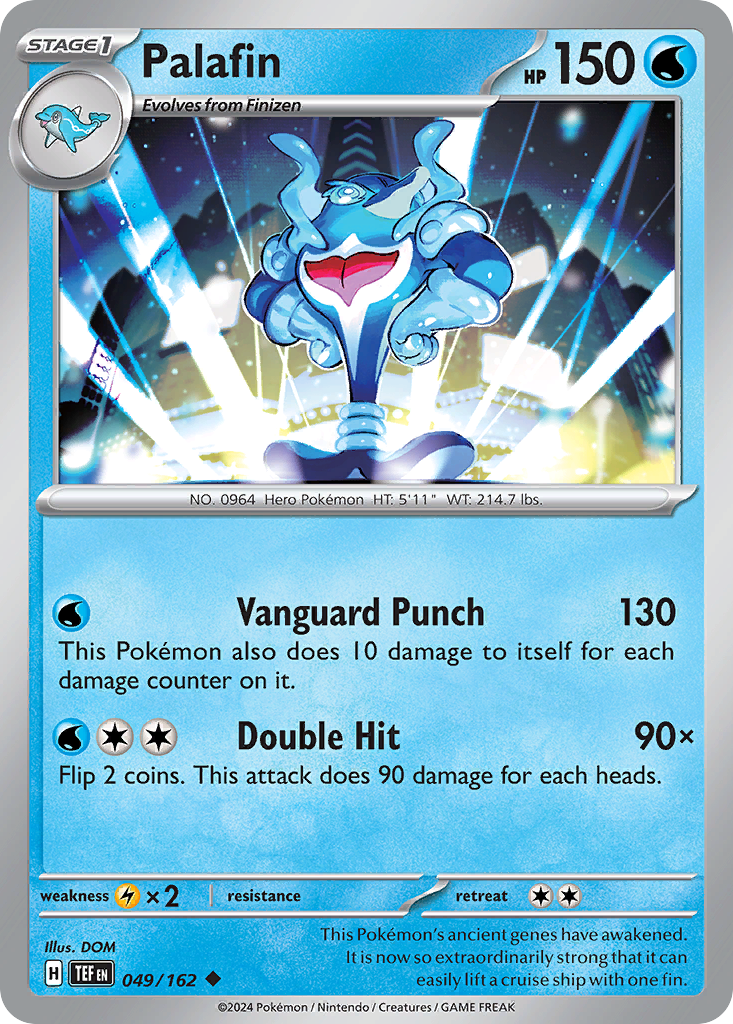
This deck loves to go first, and you have two main objectives to try and achieve simultaneously within the first two turns. One, get an attacker online, and two, get your consistency engine online. Leading with Finizen or Shellder going first gives you a great chance of setting up a great attacker that opponents will struggle to recover from. Palafin is the optimal lead, with Vanguard Punch taking KOs against nearly everything in the early game. If your opponent cannot apply some amount of damage (ideally 80) to Palafin the turn after it attacks, they are in serious danger. Cloyster is a good alternative attacker, but its two-energy attack cost means you need to get luckier to start attacking on turn 2 with it, and it doesn’t quite pose the same threat as Palafin’s full KOs do. Nevertheless, it holds down the frontline in the early game when Palafin is stuck in the prizes, sets up KOs for later in the match, pressure backline support pokemon, and its Shell Armor can pose some similarly difficult questions for your opponent to answer early.
When it comes to choosing which support pokemon to set up on the bench, Sobble is the ideal choice. It is always worth saving a ball that can search for Drizzile in hand so you can evolve Sobble the following turn, and pop off into some truly busted turns with the likes of Ball Guy or Irida. Of course you also want to get Remoraid down quickly as well, but given the choice between one or the other, Sobble takes it.
The ideal turn 1 to aim for looks like this: Finizen in the active, Sobble and Remoraid on the bench, access to an energy for next turn’s attack, and a way to search for Drizzile. Of course, there are always speed bumps to achieving this based on draws and prizing, so doing your best to emulate the strengths of this setup is part of the skill and fun of piloting the deck.
Going Second
While it doesn’t suit the attacking plan of the deck as well, the deck still makes great use of going second, leaning more into an explosive setup over relentless offense. Basculin’s Gather the Crew can get both your Sobble and Remoraid ready to evolve next turn, and you can play Ball Guy/Apricorn Maker/Irida to get set up. A slight word of caution with them though; using too many Balls or setup effects to grab basics can leave you struggling to fetch Drizzile and Octillery, and will cause your game plan to hit a major speed bump if you cannot find them after using your search effects. This is another major reason I prefer going first, as these fantastic supporters can be used on turn two to fetch your evolutions if you managed to squeeze out a couple basics onto the table turn 1. Finizen is also a solid lead going second if you have an energy, as you can use Valiant Evolution to prepare your attack next turn. This does involve offering up something to be KOed by your opponent though, but it is not the end of the world. Fork over Shellder or Basculin if you have to, but never Sobble or Remoraid. Froakie is nice to have around since it takes some turns to evolve and Frogadier’s ability can help snag a KO, but if it's all you have to sacrifice, so be it. You usually don’t need Greninja until the endgame, and there is ample recursion in the deck to pull it back later.
Mid Game
With your consistency engine running and your early attacker firing away, you are now ready to establish your midgame. This phase of the game revolves around evolving to your Stage 2 pokemon, and executing Empoleon’s Emergency Surfacing ability. If your active pokemon is attacking unchecked, great! You have a lot of room to play supporters to build up your evolutions, like Peony and Red’s Challenge. These two help get you to an empty hand while also searching for the evolutions you need. Search up or Battle Compressor your Empoleon, then discard it away and trigger Emergency Surfacing! Play out what you can of those 3 cards, then Abyssal Hand to get back up to 5. This is one of the most turbo plays of the game, and all but guarantees you’ll have the cards you need to transition into the end game.
If your opponent is able to stabilize against your lead attacker and KO it, you may need to play a recovery supporter, Nessa or Klara. Don’t be fooled though, these are not slow plays! Getting energy back to hand lets you put up Cloyster as a follow up to Palafin for example, while also setting up Finizen for yet another go at attacking. It is incredibly tough for your opponent to catch a break from attacks, largely thanks to these recovery ladies.
End Game
With Greninja and Inteleon fully evolved, it is time to transition into the end game. Greninja is an indomitable force in the active slot, putting your opponent in a do-or-die situation. Their bench is likely softened up from Cloyster and Inteleon’s chip damage, and Greninja can start reaching for mutli-KO attacks. Dealing 50 damage twice opens up some important math equations to be aware of as you play through the game. Two Quick Shootings and a Shuriken takes out enemy 90HP support mons like Flaafy and Drakloak. 30 damage from Aqua Split, a Quick Shooting, and a Shuriken takes out those at 100HP. Knowing the HP values of opposing pokemon before they evolve can be a big determining factor for what to target with Quick Shooting and Aqua Spilt, so plan around finishing things off with 50 damage from Greninja as best as you can.
Specific Discussions
There are many other cards in the deck and specific principles not yet addressed, and I’d like to get into those a bit more outside of the general game plan discussion.
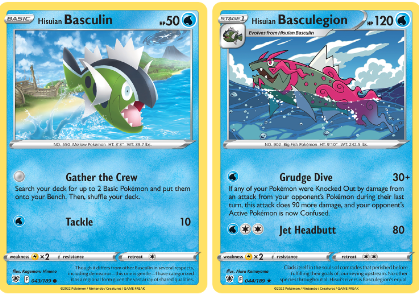
Basculin and Basculegion
This evolution line takes no primary role in the deck, but does a great job at highlighting the value of redundancy and contingency. Basculegion’s Grudge Dive applies similar pressure as Palafin does, but only for one turn. It is often revenge KOed, but it maintains your pressure for a whole turn after your opponent puts in the effort to take out your lead attacker. Just enough time to play out Nessa and establish Palafin a second time! Basculin’s Gather the Crew ability was also addressed as something good to do when going second, but count on it getting KOed afterwards. The fact that Basculegion does not play a primary role is perfect for this actually, as your opponent clears out your active spot for Palafin or Cloyster, when surviving and evolving to Basculegion would leave you with a weak active pokemon in need of a switch out. All this to say, this is probably the easiest pokemon line to bail on, but also don’t underestimate its ability to set you up and maintain pressure.
Empoleon
Emergency Surfacing carries some nuance with it that needs to be considered throughout the game. The deck has 7 evolution lines, which means you could lock yourself out of Empoleon if you fill your bench before playing it. Check your prizes early to see which basic pokemon to pass on deploying to make sure Empoleon has space to surface. There are tons of different ways to discard Empoleon in the deck, and enough variety in the Item card lineup to path out some great Peony turns. One play that is hard to pull off in this deck is to attack with Empoleon the turn it enters play, but it is possible. I used to run Viridian Forest for this role, but it felt too disadvantageous to give my opponent access to energy to pull it off. Essentially, you’d need to discard Empoleon, dump your hand, switch it forward, and attach an energy all in one turn, which is just a bit too ambitious for the payoff. Instead, I treat Empoleon as a nice bridge gap pokemon. It is pretty easy to organically play it at some point in the mid game, and it can be a solid threat up front if the opponent can’t KO it right away. 60 snipe for one energy is no joke, especially sooner rather than later. This can be a key way to disrupt your opponent from setting up and standing a chance at surviving your transition into the end game. All in all, don’t overcommit to Empoleon, but he is certainly worth the effort. If all he does is draw through your deck a bit faster, that is sufficient.
Adventure Bag
I opted for this card after cutting Arven, who was just too weak of a setup supporter in my early testing for this deck, paling in comparison to Ball Guy, Apricorn Maker and Irida. The included tools are all great to have, but for the most part are not needed for setting up the way a TM Evo or Energize are. However, Irida can grab Adventure Bag to get you access to Float Stone/Air Balloon to switch you out of a bad lead like Remoraid, while also getting you a Muscle Band or Luxurious Cape to create a truly fearsome Palafin lead! Speaking of Cape, it also plays great on Greninja, further demoralizing your opponent even if they hit through Evasion Jutsu. Just nasty! I had played Pot Helmet here before, but you just need to be able to survive a Snorlax’s 180.
Battle Compressor
This deck flows FAST. I almost always get down to 10 or fewer cards in the deck by the end of an even match. Battle Compressor helps tremendously to take dead draws out of the deck once you are past the setup phase of the game. Very often, your endgame hand is just a bunch of supporters and energy, giving you a lot of choice with how to finish the game. Typically this is Nessa/Klara and Boss’s/Guzma, which are all great for taking final KOs and not running out of gas. Battle Compressor is also a key way to get Empoleon in the bin, or even a Water energy if you have Aqua Patch handy. A word of caution though, you can mill yourself to a game loss if you hit the gas pedal too hard, so be mindful of using Abyssal Hand too much as the game closes out.
Prize Mitigation
Aggressive decks like this one have the nice advantage of accessing their prized cards quickly through taking KOs. Town Map is a great companion for a Palafin lead, allowing you to grab that trapped Drizzile or Octillery and continue on your merry way. Its great to have powerful items that you can just play out as you draw them to keep the card draw flowing. I also run Peonia, who somewhat synergizes with Town Map when you really need something, or simply is a good 50/50 shot at grabbing something you need from the prizes when Shady Dealings can’t get it for you from the deck. She also has a unique ability to tuck away evolutions and other supporters that you can’t play on that turn in order to help facilitate dumping the rest of your hand for Empoleon deployment or even just more Abyssal Hand draw.
Weaknesses
No deck is perfect, and there are some things this deck struggles against. With no real 3+ energy cost attacks in the deck, super tanky pokemon like Wailord and Torterra can pose a threat to your momentum. The best plan of action is to try and KO the pre-evolutions to disrupt their evolving and close the game out before they can make a reappearance. If that fails, you can also try to close the game out with bench sniping to take the final prizes.
Another weakness of the deck is that it can lack some ability to increase in power in the late game. So much of the deck is dedicated to consistency, that there can be times you are unable to use a supporter or card draw to meaningfully access more strength. All the more reason to leverage that consistency into disruptive aggressive starts so you minimize the chances of getting into an endgame where you can’t climb out from.
Bench Barrier abilities can also pose a tall hurdle to jump over given how many attackers deal bench damage. Fortunately, you can try to Boss/Guzma those and attack with Palafin to burn through their recovery. You can even use Frogadier and Inteleon’s abilities to take them out, notably Mew at 60HP can be chipped away at rather efficiently. Since Spread damage usually takes place in the mid to late game, try to leverage the early game Palafin attacks in a way that leaves them without Bench Barrier in the late game. I haven’t yet been forced to squeeze in Silent Lab, and I hope to keep it that way through brute force.
Tournament Results
I recently went 4-0 with this list at a 20-person local event, and have recorded footage of rounds 2, 3, and 4 of the event to share. These videos really show how brutal Vanguard Palafin is as a lead that can just take too many prizes in the early game for opponents to catch up. Thanks for reading, I hope you enjoyed it!
Round 2 vs Wailord Water:
Round 3 vs Lost Zone Psychic:
Round 4 vs Evolution Grass:
Edit
Since the time of the tournament, I have made some minor adjustments to the deck. I cut one Water Energy, Peonia, and Adventure Bag for Startling Megaphone, Arven and Escape Rope. Mainly, I found the deck has plenty of energy search (Letter, Vessel, Aqua’s Ball) as well as energy recursion in Klara, Nessa, and Aqua Patch, so I didn’t really need the last basic energy. Arven and Escape Rope are tried and true cards, and I’m honestly just putting them in to get out of ability lock from Wobbuffet/GWeezing, since without Shady Dealings and Abyssal Hand, you really can’t get anything done.
Peonia is great, but without Adventure Bag, I felt it made sense to go with Arven, who also is an out to Escape Rope when needed. I only cut Escape Rope in my early testing since it is sometimes not a card you can dump from hand to good effect when trying to reload with Abyssal Hand or deploying Empoleon.
Pot Helmet is just another easy card to slam down at any time. Preventing Palafin from early chip damage and further recoil, doubling down on Cloyster’s defense, and saving Greninja for another Jutsu coin flip are all great applications, earning this card its spot.
I also did a minor upgrade from Rescue Stretcher to Night Stretcher, since I never was using the shuffle in and am happy to have the option to grab an energy back. The main use is to recover from an early loss like a Remoraid Lead and moving on with your life, or to allow you to discard an evolution pokemon to empty the hand for Empoleon, and get it back later.